Nailing It: DIY Color-Block Nails
 This season color-blocking is all the rage — and the brighter, the better. But that doesn’t have to mean a complete wardrobe overhaul. Pair a subtle tube dress with a blazer and show-stopping nails, and people will know you’re sophisticated, yet stylish.
What you’ll need:
– A base coat and four polishes in complementary hues
– Nail file, nail clippers, and a cuticle remover
– Something to block off sections of the nail. I used Post-Its, but you could use striping tape
– A friend to help you paint your dominant hand (this is the hardest part!)
– Nail polish remover

What to do:
1. Prime your nails. Remove any excess polish or dirt by quickly running the polish remover over each nail. Push back cuticles, and then trim and/or file until you’re happy with the shape.
2. Cover each nail with a thin layer of the base coat and let dry.
 3. Vertically block off half of your thumbnail with the Post-It or nail tape, and paint the remaining section of nail. Rip off Post-It or tape immediately and then let dry. Repeat for all five fingers of one hand.
4. Once the first color is completely dry, paint the other side of each nail with a contrasting color. Let dry.
5. This time, set the Post-It up so it horizontally crosses the nail bed. Paint over one of the existing colors. Promptly remove Post-It, and repeat for each nail.
6. Let the polish dry completely before you attempt to paint the last and final section of each nail, creating a pin-wheel effect. Let dry.
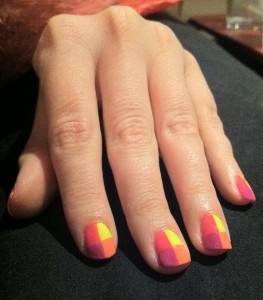
7. Finish with a shiny, no-chip top coat.
8. Enlist a friend to repeat steps 3-7 on the nails of your dominant hand.
9. Hit the town in a look that says, I’m ultra fashionable, but not a slave to trends.