Video: Beginner’s Guide to a Barbell Back Squat
Personal trainer Christina Chu of NovusFit Studios provides a step-by-step guide to the barbell back squat.
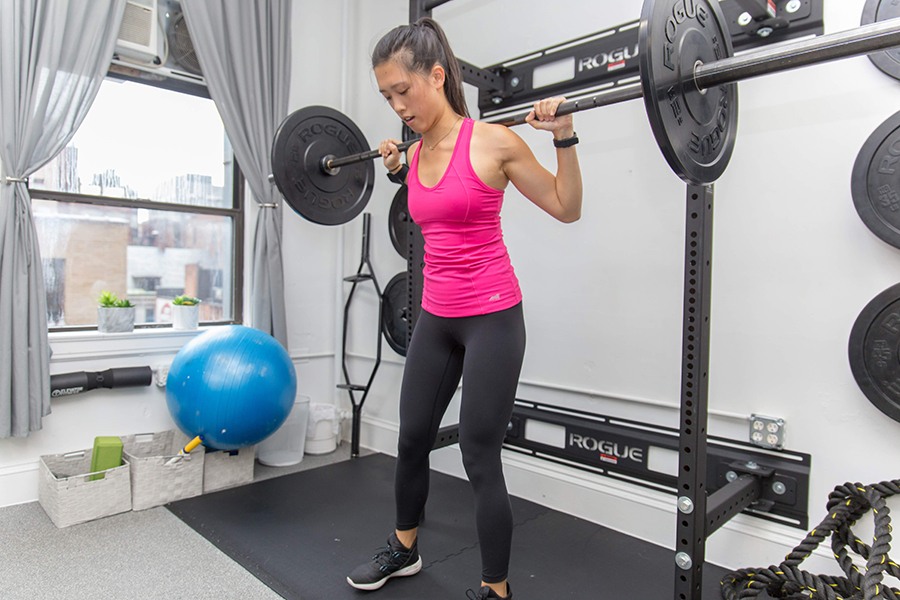
Photo provided
As a trainer, it’s my job to support my clients and get them to do things they never thought they could do. One of the biggest challenges, especially with my clients who are women, is the barbell. It’s a rather large contraption that makes you think of a big, scary, gorilla-looking man with veins popping out of his head using it. However, it’s so important to break this misconception, as strength training (which can include using the barbell) has many benefits. Some of these include:
- Increased muscle mass
- Better joint strength and slowing the progression of osteoarthritis
- Decreased risk of injury while participating in other activities
- Improved mood
Let’s not forget about the increased self-confidence and the joy in seeing your body get stronger. Strength and barbell training is important for physical fitness, and this guide will walk you through all the basics of a barbell squat to get you started.
Warmup
8-12 reps of each
- Inchworms: From standing, bend down to the ground and place your hands on the floor, walk them out into a tall plank position like you’re getting ready to do a push-up, and walk them back up to a standing position.
- Low squat: With your hips low in a squat position, shift your weight from side to side, front to back, and/or in a circle to warm up your hips.
- Banded pullback: Grab the ends of a band and pull to the sides with straight arms, squeezing your shoulder blades together (like you’re cracking a walnut between your shoulder blades).
- Banded wrap-around: With the same band, holding your hands a little more than shoulder-width apart, bring the band over your head and behind you for a full circular motion (or as far as you can) without arching your back. Your hands should be traveling in front of you, then straight up and down, and finally behind you as far as you can go. If you experience pain in the shoulders, try it without the band and perform the movement one arm at a time.
- Air squats: With your feet at least shoulder width apart, sit back like you’re sitting in a chair, and drive with your heels and the balls of your feet to stand back up.
- Kettlebell goblet squat: Same motion as your air squat, but with a kettlebell held tight to your chest.
Set-up
Bar Height:
The bar should be at the same level as your collarbone. If the bar is set too low, the lift-off from the squat rack would require using either your back or more of your quads, which is less optimal. If the bar is too high, the lift-off from the squat rack would require you to go on your toes (which is unsafe) or the lift-off cannot be achieved.
To change the height, remove the barbell from the squat rack and adjust the hooks to an appropriate height. Trial and error is completely acceptable, because it’s more important that it’s set up properly than to try and rush through it.
Hand positioning:
I find that I, and many of my clients, prefer to place their hands a thumb’s distance from the line that separates the smooth and gritty part (knurling) of the barbell. However, some people, like those with wider shoulders or restricted shoulder mobility prefer to place their ring finger on the smooth ring of the barbell in the gritty part. Whichever feels more comfortable is the right position for you, which may even change as you progress.
Execution
- Make sure the bar is centered on squat rack.
- Place your hands in whichever position you’ve chosen.
- Get under the bar and place it on your upper back. Make sure your shoulder blades are engaged (think: tall posture, with your elbows down) and the bar is secured on your body.
- Lift off from the squat rack and take 1-2 steps back so that when you squat, the bar doesn’t hit the hooks. Feet should be at least shoulder width apart, and the balls of your feet (both on your pinky toe and big toe side) and your heel should be firm on the ground, almost like your foot is gripping the floor. It might help to take your shoes off, as most shoes have high arches or soft padding, and this can cause the base of support for your squat to be unstable. You want to be as flat and close to the ground as possible unless you have poor ankle mobility. If that’s the case, a pair of lifting shoes, with a lifted heel, might be more beneficial. Your core should be activated (almost as if you’re preparing for someone to punch you in the stomach).
- Sit back into your squat until your thighs are parallel to the ground, your chest has a natural lean forward, and your knees remain forward without caving in.
- Push up through the ground, making sure your heels are down, all the way to standing.
*Gym Etiquette Note: Once you finish all of your barbell squats, please return any plates (weights you put on the barbell) you have used to the proper weight tree!
My key piece of advice? Keep practicing. This wasn’t something that the strongest lifters learned overnight. Everyone has to start somewhere in order for progress to be achieved. Please don’t be discouraged if you feel like you aren’t doing it right. Do your research, watch lots of videos (one of my favorite local sources is Achieve Fitness), increase the weights if it feels too easy, hire a trainer if you need to, and keep improving—small steps are better than no steps.
Go out there and have a great workout!