How To Use Your Desk Phone
Boston
- To access your voicemail box, press the button on your phone labeled Messages or resembling an envelope. If you cannot locate the button, you can dial *62.
- Enter your default PIN, which is 0000. You will be prompted to update your PIN once you are logged in. This will take you to your voicemail menu.
- Follow the prompts to set up a personalized greeting, check messages, adjust your PIN, and more.
Placing a Call:
Placing a phone call requires only two steps, which can be performed in any order:
- Dial the number
- Pick up the handset or press the Speakerphone or Headset key
Using Voicemail:
If you have a voicemail message waiting, the Message Indicator Light (i.e. red flashing light in the upper right hand side of your phone) will flash.
- Press the Menu key and select Features
- Highlight Messages and press the checkmark key
You will then be prompted to enter your password to proceed with the instructions.
Redialing Numbers:
All inbound and outbound phone calls are logged by phone in call lists. You can use these lists to redial numbers in two ways:
- Press the Callers soft key to view the receive call list
- Use the Arrow keys to find the contact and press the Dial to start the call
OR
- Press the Dial key to view the placed call list
- Use the Arrow keys to find the contact and press the Dial to start the call
Setting Up a Conference Call:
You can invite multiple users to a single phone call using conferencing.
- Call the first party then press the Conf soft key to create a new call
- Call the second party, when the second party answers, press the Conf soft key again to join all parties
Enabling Do Not Disturb:
To automatically send all incoming phone calls to voicemail or call forwarding, set up the Do Not Disturb feature.
- Press the Menu key (located on the left side of the keypad) then select Features
- Press select (i.e. the round checkmark button in the upper middle of the keypad) to enable Do Not Disturb
- Press the Menu key to return back to the idle screen
To disable Do Not Disturb, follow the same steps
Automatic Call Forwarding:
Call forwarding guarantees important phone calls will always follow you and find you.
- To set up call forwarding, simply dial *72 from your desk phone. You will then be prompted to input the number where you want your calls sent. The phone will display call forwarding is enabled.
- To deactivate call forwarding, you can dial *73 and calls will ring through to your phone as normal.
- If you would prefer all calls to go to voicemail, you can use the Do Not Disturb button on your phone, or dial *78. You can then dial *79 to disable Do Not Disturb.
Transferring a Call:
There are two ways to transfer a call:
- Consultative transfer – talk to the person you are transferring the call to
- During the call, press the Trans soft key and enter the number to which you want to transfer the call
- As soon as you hear the ring-back or the party answers, press the Trans soft key again and the two will be connected
- If you want to cancel the transfer before the call connects, press the Cancel soft key.
- Blind transfer – transfer the call without involvement
- During the call, press the Trans soft key
- Press the Blind soft key and enter the number which you want to transfer the call
- Hang up. The call will automatically be connected.
Viewing or Clearing Call Lists
Press Menu, press Features, press Call Lists, then press Received calls or Placed calls. To place a call, press Dial. To remove the call from the list, select Delete. To view information about the call (date/time), press Info.
Frequently Used Phone Functions & Shortcuts
Support@nextiva.com
800.285.7995
Philly
- Pick up the receiver and press the Message Key on your phone.
- When the Voice Mail system answers, it will prompt you for your Mailbox
Enter the four digits of your extension ________ and press the # key. - It will then prompt you for a Password. Enter the same four digits _________ #.
To skip to the set up of your greeting:
- Press 8 – 2 – 1
- Then press 5 to begin recording.
- Say something like – “This is (name) at Philadelphia magazine. I am away from my office. Please leave a message and I will return your call as soon as possible.”
If you want to add to this with “you can try to reach me on my cell at ###-###-####” you can do that as well. - When you have finished recording, press the # key.
(To review the message, press 2. To delete it, press 76. To re-record, press 5.) - Press 8 – 9 to record your “personal verification” or Full Name. Press 5, say your name, then press #.
- Press 8 – 3 to exit.
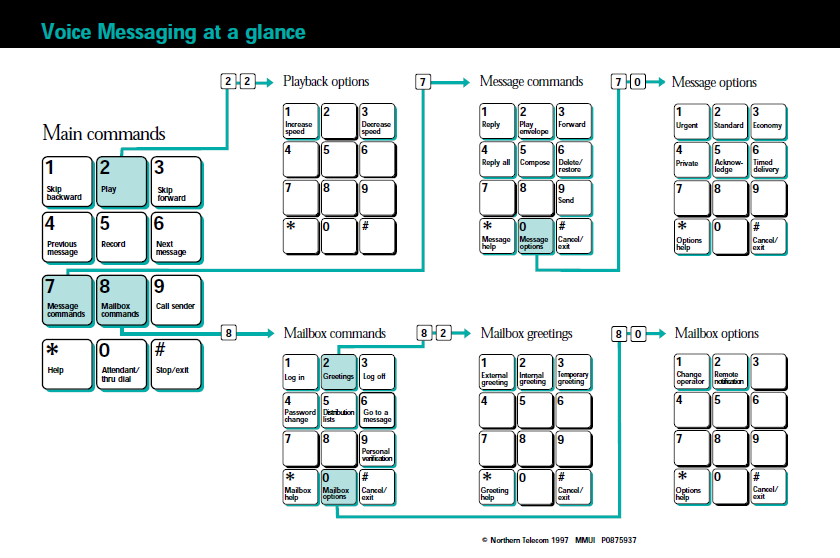
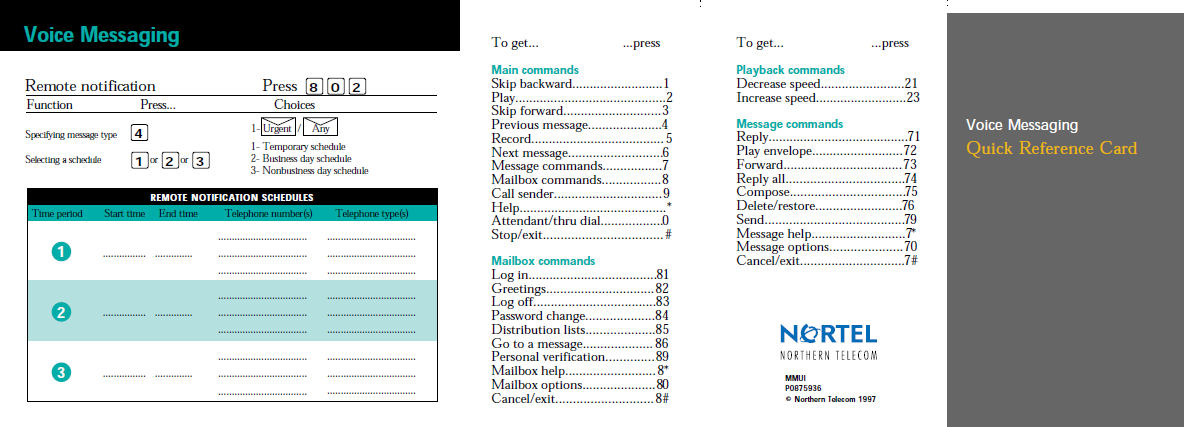
You can also press the * key at any time in the Meridian Mail system to get more options.
For additional instructions, click to expand the graphics below and/or click here to open the complete Meridian Mail User Guide.