Make This Stool at Home for Less Than $5

Photos courtesy of HomeMade Modern
Solid wood furniture is better than particle board, but it can also be surprisingly cheaper, if you’re willing to make it yourself.
Boston designer Ben Uyeda has endless ideas in his new book, HomeMade Modern, and with building materials like steel and concrete, and a focus on sustainability, none of them will leave your space a looking like a hodgepodge of spray painted garage sale finds.
With projects for every room, including outdoor spaces, you can be a non-expert craftsman and create some of these looks. Case in point: here are directions for creating this cool industrial-style stool for less than $5.
Excerpt from HomeMade Modern:
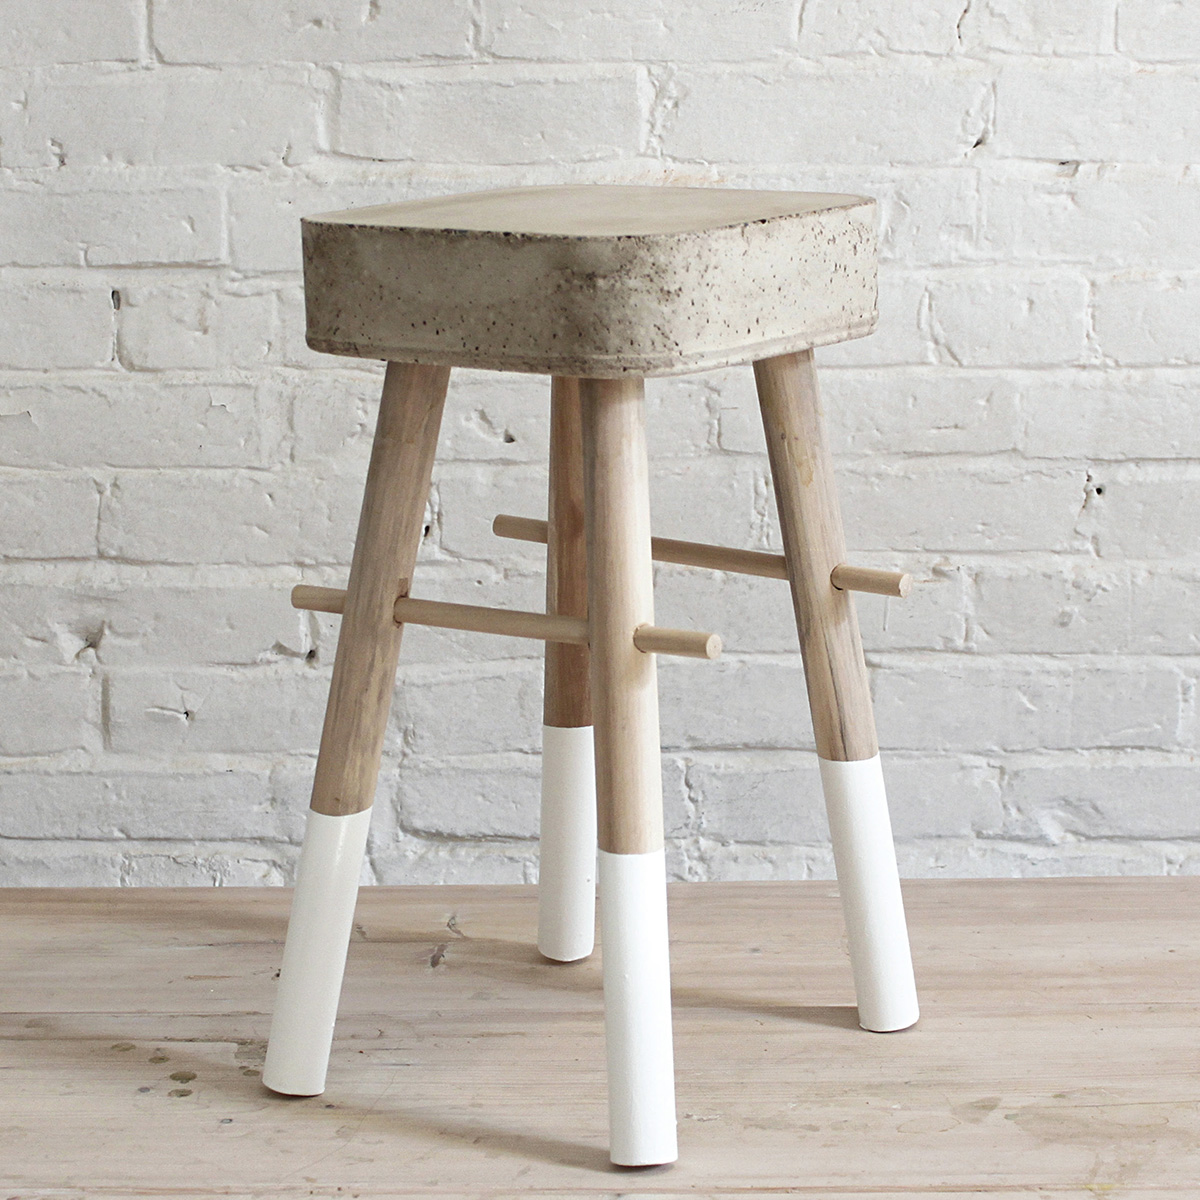
The Concrete Bucket Stool
This is the project that started it all, and my Concrete Bucket Stool still epitomizes exactly what I am trying to do at HomeMade Modern. It’s durable, simple to make, and aesthetically pleasing. This stool looks like it could retail for $50, but you can make it for $5. All you do is mix the concrete right in the bucket, add three dowels for legs while it’s still wet, and let it cure. When you remove it, there’s no damage to the bucket, and you have your very own modern piece of furniture.
Estimated Time: 1 hour plus curing time
Estimated Cost: Under $5
Supplies:
48″-long wooden dowel with a 1¼” diameter
Quikrete 5000 Concrete Mix
5-gallon plastic bucket with a smooth bottom
Concrete blocks or scrap wood
Plastic water bottle
White interior house paint in a semi-gloss finish with a low VOC, or as desired
4 copper pipe caps that have an interior diameter of about 1¼” (optional) (big enough to fit snugly on the end of the dowels)
Construction adhesive (optional)
Washers with an outer diameter between 3/4″ and 1 1/8″ (optional)
Tools:
Ruler
Pencil
Hand saw or circular saw
Measuring cup
Stick, hand shovel, or large mixing spoon
120-grit sandpaper
NOTE: A single 48-inch-long dowel is all you need to make three sturdy legs. Although I used 1¼-inch- diameter dowels for the legs, you can use 1-inch-diameter or 1½-inch-diameter dowels too. An alternative to using dowels for the legs is to use old tool handles.
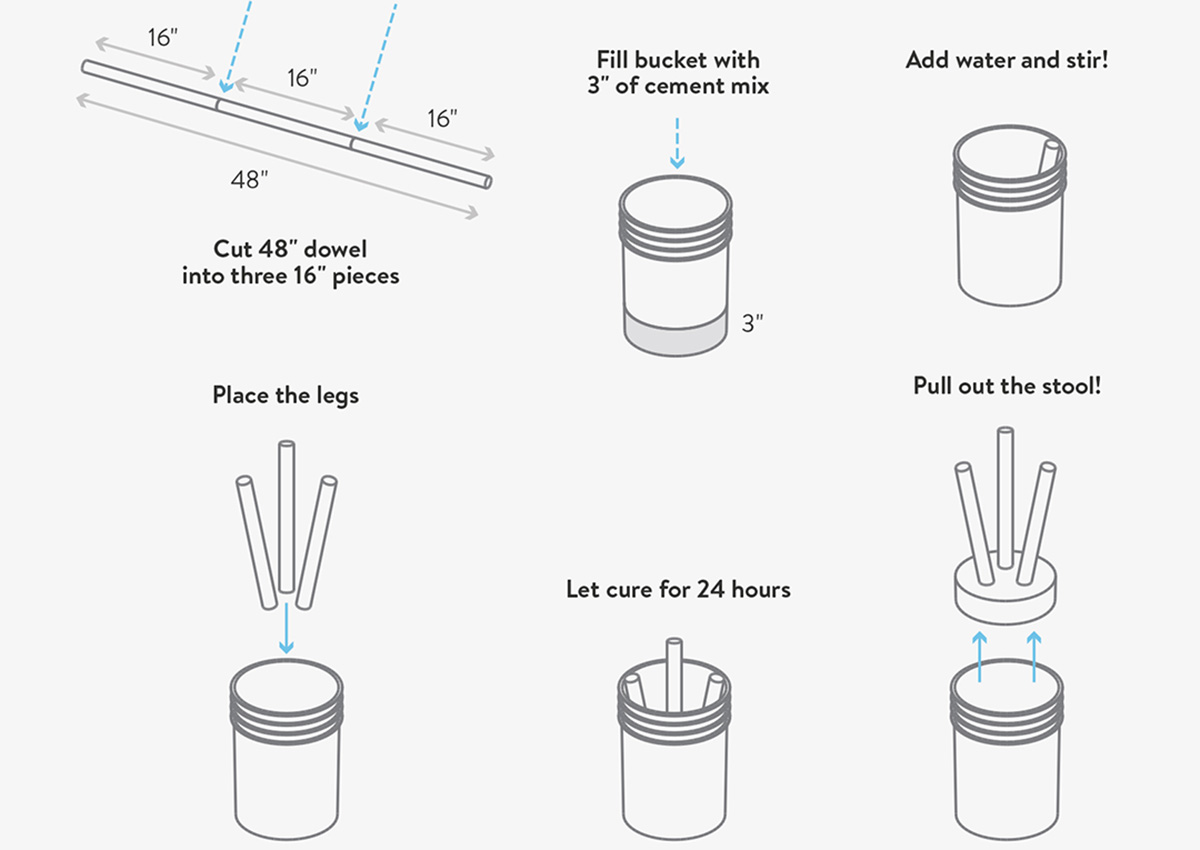
1. Cut the legs. Cut the 48″ dowel into three 16″ pieces using the ruler, pencil, and either a hand saw or a circular saw.
2. Mix the concrete. Add 3″ of dry concrete to the bottom of a clean, dry bucket. Follow the manufacturer’s recommendation, or mix in approximately three cups of water and stir it thoroughly using a stick, hand shovel, or large mixing spoon until every grain is wet. Add additional water, as needed, until the mix is the consistency of cookie dough. (Don’t overwater the concrete or it will become weak and crumble.)
3. Shake out the bubbles. Mixed concrete has air bubbles trapped inside. Shake and tap the bucket to bring the bubbles to the surface.
4. Place the legs. Once the concrete has settled and most of the air bubbles are out, place the three dowel legs into the bucket, one at a time, 1½” deep into the concrete mixture, then let them rest against the sides of the bucket.
Photos courtesy of HomeMade Modern
5. Let the concrete cure. Wait 20 hours for the concrete to cure. Remove the bucket by bending the sides outward a few times in each direction to loosen the concrete, then pull the stool out by the legs.
6. Sand the edges. The concrete has not yet fully hardened and should be pretty easy to work with. Use 120-grit sandpaper to smooth the edges by hand.
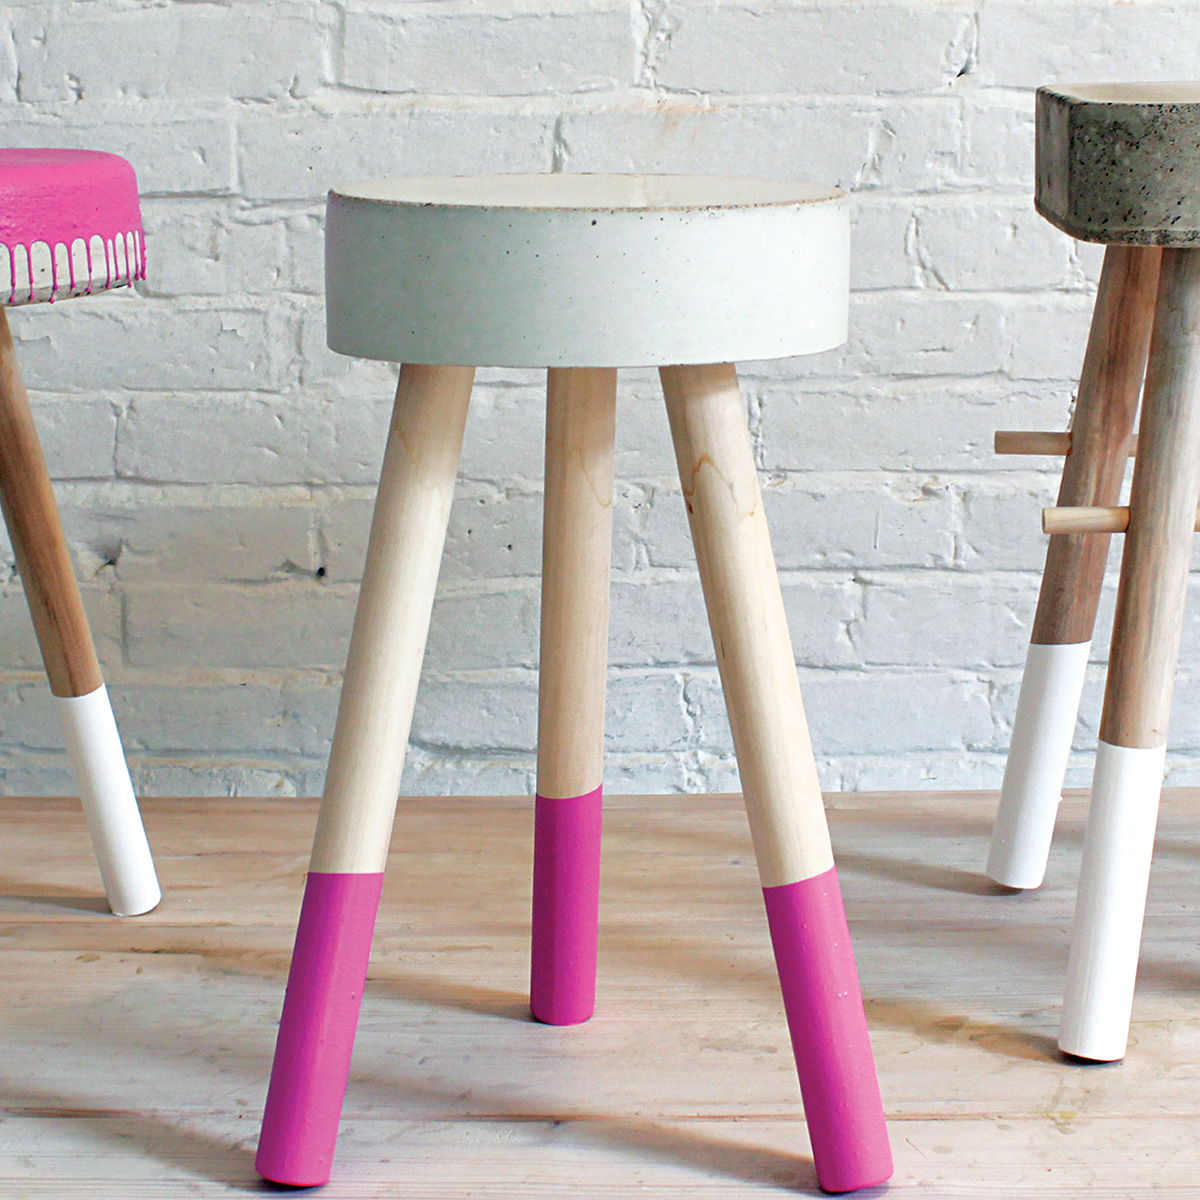
7. Dip-dye the legs. Elevate the stool by placing it on top of concrete blocks or scrap wood to suspend the legs off the floor. Cut the top off the plastic water bottle and fill it with paint. Dip each leg into the bottle filled with paint. Allow the paint to dry completely.
Optional
8. Level out the legs with pipe caps. If your stool sits level on the floor, you’re done. You can add pipe caps secured with construction adhesive to the bottom of each leg as a decorative element. Or, if one of the legs is shorter than the others, add a few washers to the cap before attaching it with the glue to make the leg even with the rest.
Photos courtesy of HomeMade Modern
What can go wrong?
Uneven legs.
The legs can settle in the wet concrete unevenly. If this happens, trim them until they’re level using a hand saw or multi-tool while the stool is still in the bucket. Use the rim of the bucket as a guide for how much to remove.
The concrete breaks.
If your concrete breaks, you either made it too thin, put the legs too close together or too close to the sides of the bucket, or added too much water. Thankfully, concrete is cheap, so if you mess up, use the legs again for your second try.
The stool sticks in the bucket.
This can happen if your bucket had a rough, scratched interior or was dirty prior to adding the concrete. Flex and bend the bucket to create separation between the walls of the bucket and the concrete. Adding water may help it slide out a bit, and if all else fails, use a heat gun to warm the bucket and soften the plastic.
Alternatives
Use other materials as molds. I used a square metal cake pan to make a 4-legged stool and added cross supports to the legs for additional strength. I used a silicon and glass round cake pan with commercial-grade, white Quikrete Countertop Mix to make a round version. This form worked incredibly well and left the concrete with a glassy, smooth finish. You can also add four longer legs and create a bar stool.
What if you don’t want it anymore?
You can pull the legs out or cut them off to be reused for other projects. Turn the concrete seat into a paver or stepping stone in your yard.
Photos courtesy of HomeMade Modern
Reprinted with permission from HomeMade Modern © 2015 by Ben Uyeda, Running Press, a member of the Perseus Books Group.